
Prototype Workbench Guide
Build game UI prototypes with pages, components and templates, then save editable JSON or export PNG/JPG to your device or AI Studio canvas.
Use Prototype Workbench to establish layout, hierarchy and content before creating finished game art. This guide follows a game home screen from page setup to reusable templates and image delivery.
1. Open the editor and set up a page
Open a project in AI Studio and choose Prototype Workbench from the canvas creation toolbar. Page management and editing tools sit at the top, the library on the left, the canvas in the middle, and properties on the right.
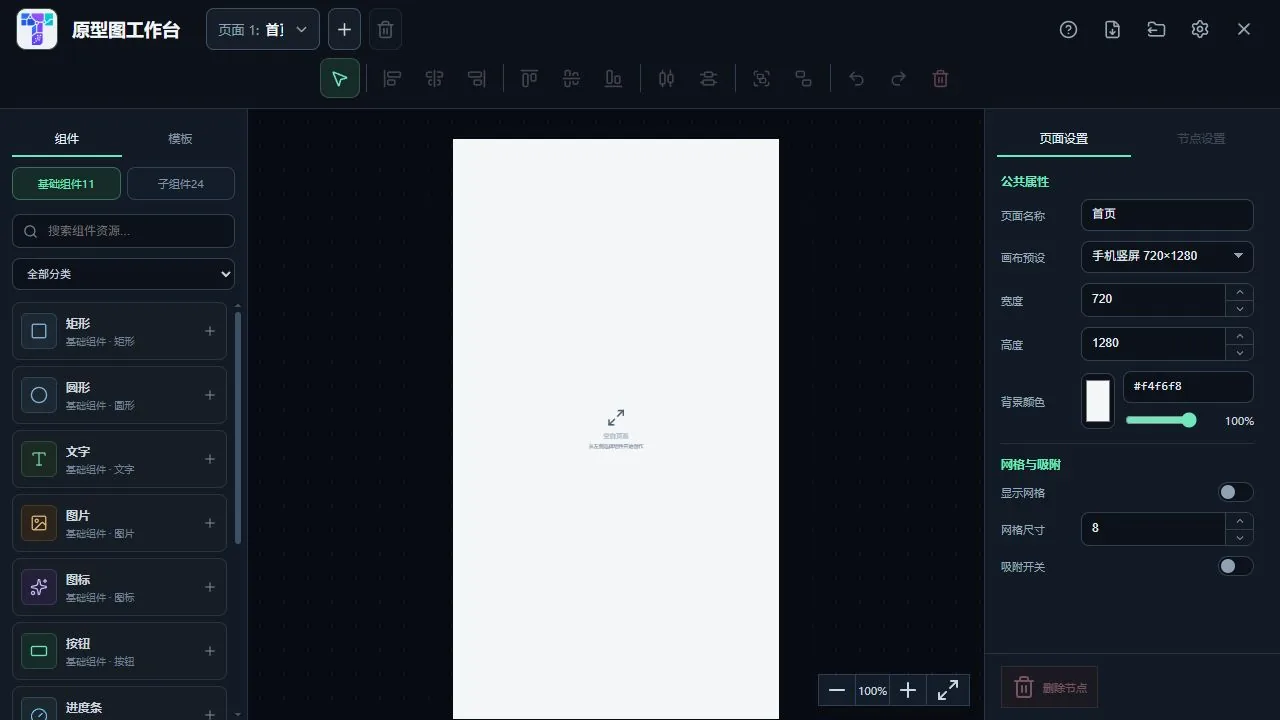
Choose a page preset or enter width and height in Page settings. Set the background color and opacity. Add, rename and switch pages from the header; use Fit to view the complete design.
2. Build from components or a template
- Search or filter the component library. Click to insert at the center or drag to a position. Start with a background rectangle, heading and main button.
- Use subcomponents for reusable resource bars, character information and item slots.
- Choose a page from Templates, then customize it. Export any existing work you need before applying a template.
- Resource insertion requires workbench access. Follow sign-in or upgrade prompts if shown; inserting components does not spend generation credits.
3. Edit properties and media
Select a node to change geometry and supported text, color, image or icon properties in Node settings. Use built-in materials or the available upload controls for your own images. Check scaling and edges before arranging the rest of the screen.
4. Align, group and undo
- Select multiple nodes to align or distribute them. Enable grid and snapping for regular spacing.
- Ctrl/Cmd+G groups nodes; Ctrl/Cmd+B ungroups them. Click a member to select its group, or double-click to edit the member.
- Deleting a group also deletes its members. Ungroup first if you want to keep them.
- Ctrl/Cmd+Z undoes edits; Ctrl/Cmd+Y or Ctrl/Cmd+Shift+Z redoes them. Open Help for clipboard and layer shortcuts.
5. Save editable work and export images
- Export a template as JSON to preserve editable nodes. Use Import template to restore a compatible file; resolve validation errors before retrying.
- Download the active page as PNG/JPG without selection boxes or editor controls. Use PNG and check page opacity when you need transparency.
- Export PNG/JPG to the host canvas to continue using the page as a reference or creative asset.
- Check current access and credit labels before confirming an export.
Troubleshooting and delivery checks
For missing nodes, fit the page and check the active page and layers. Disabled tools may require a selection or access. Before delivery, check text overflow, page bounds, missing media and exported dimensions. Keep the original JSON if import validation fails.